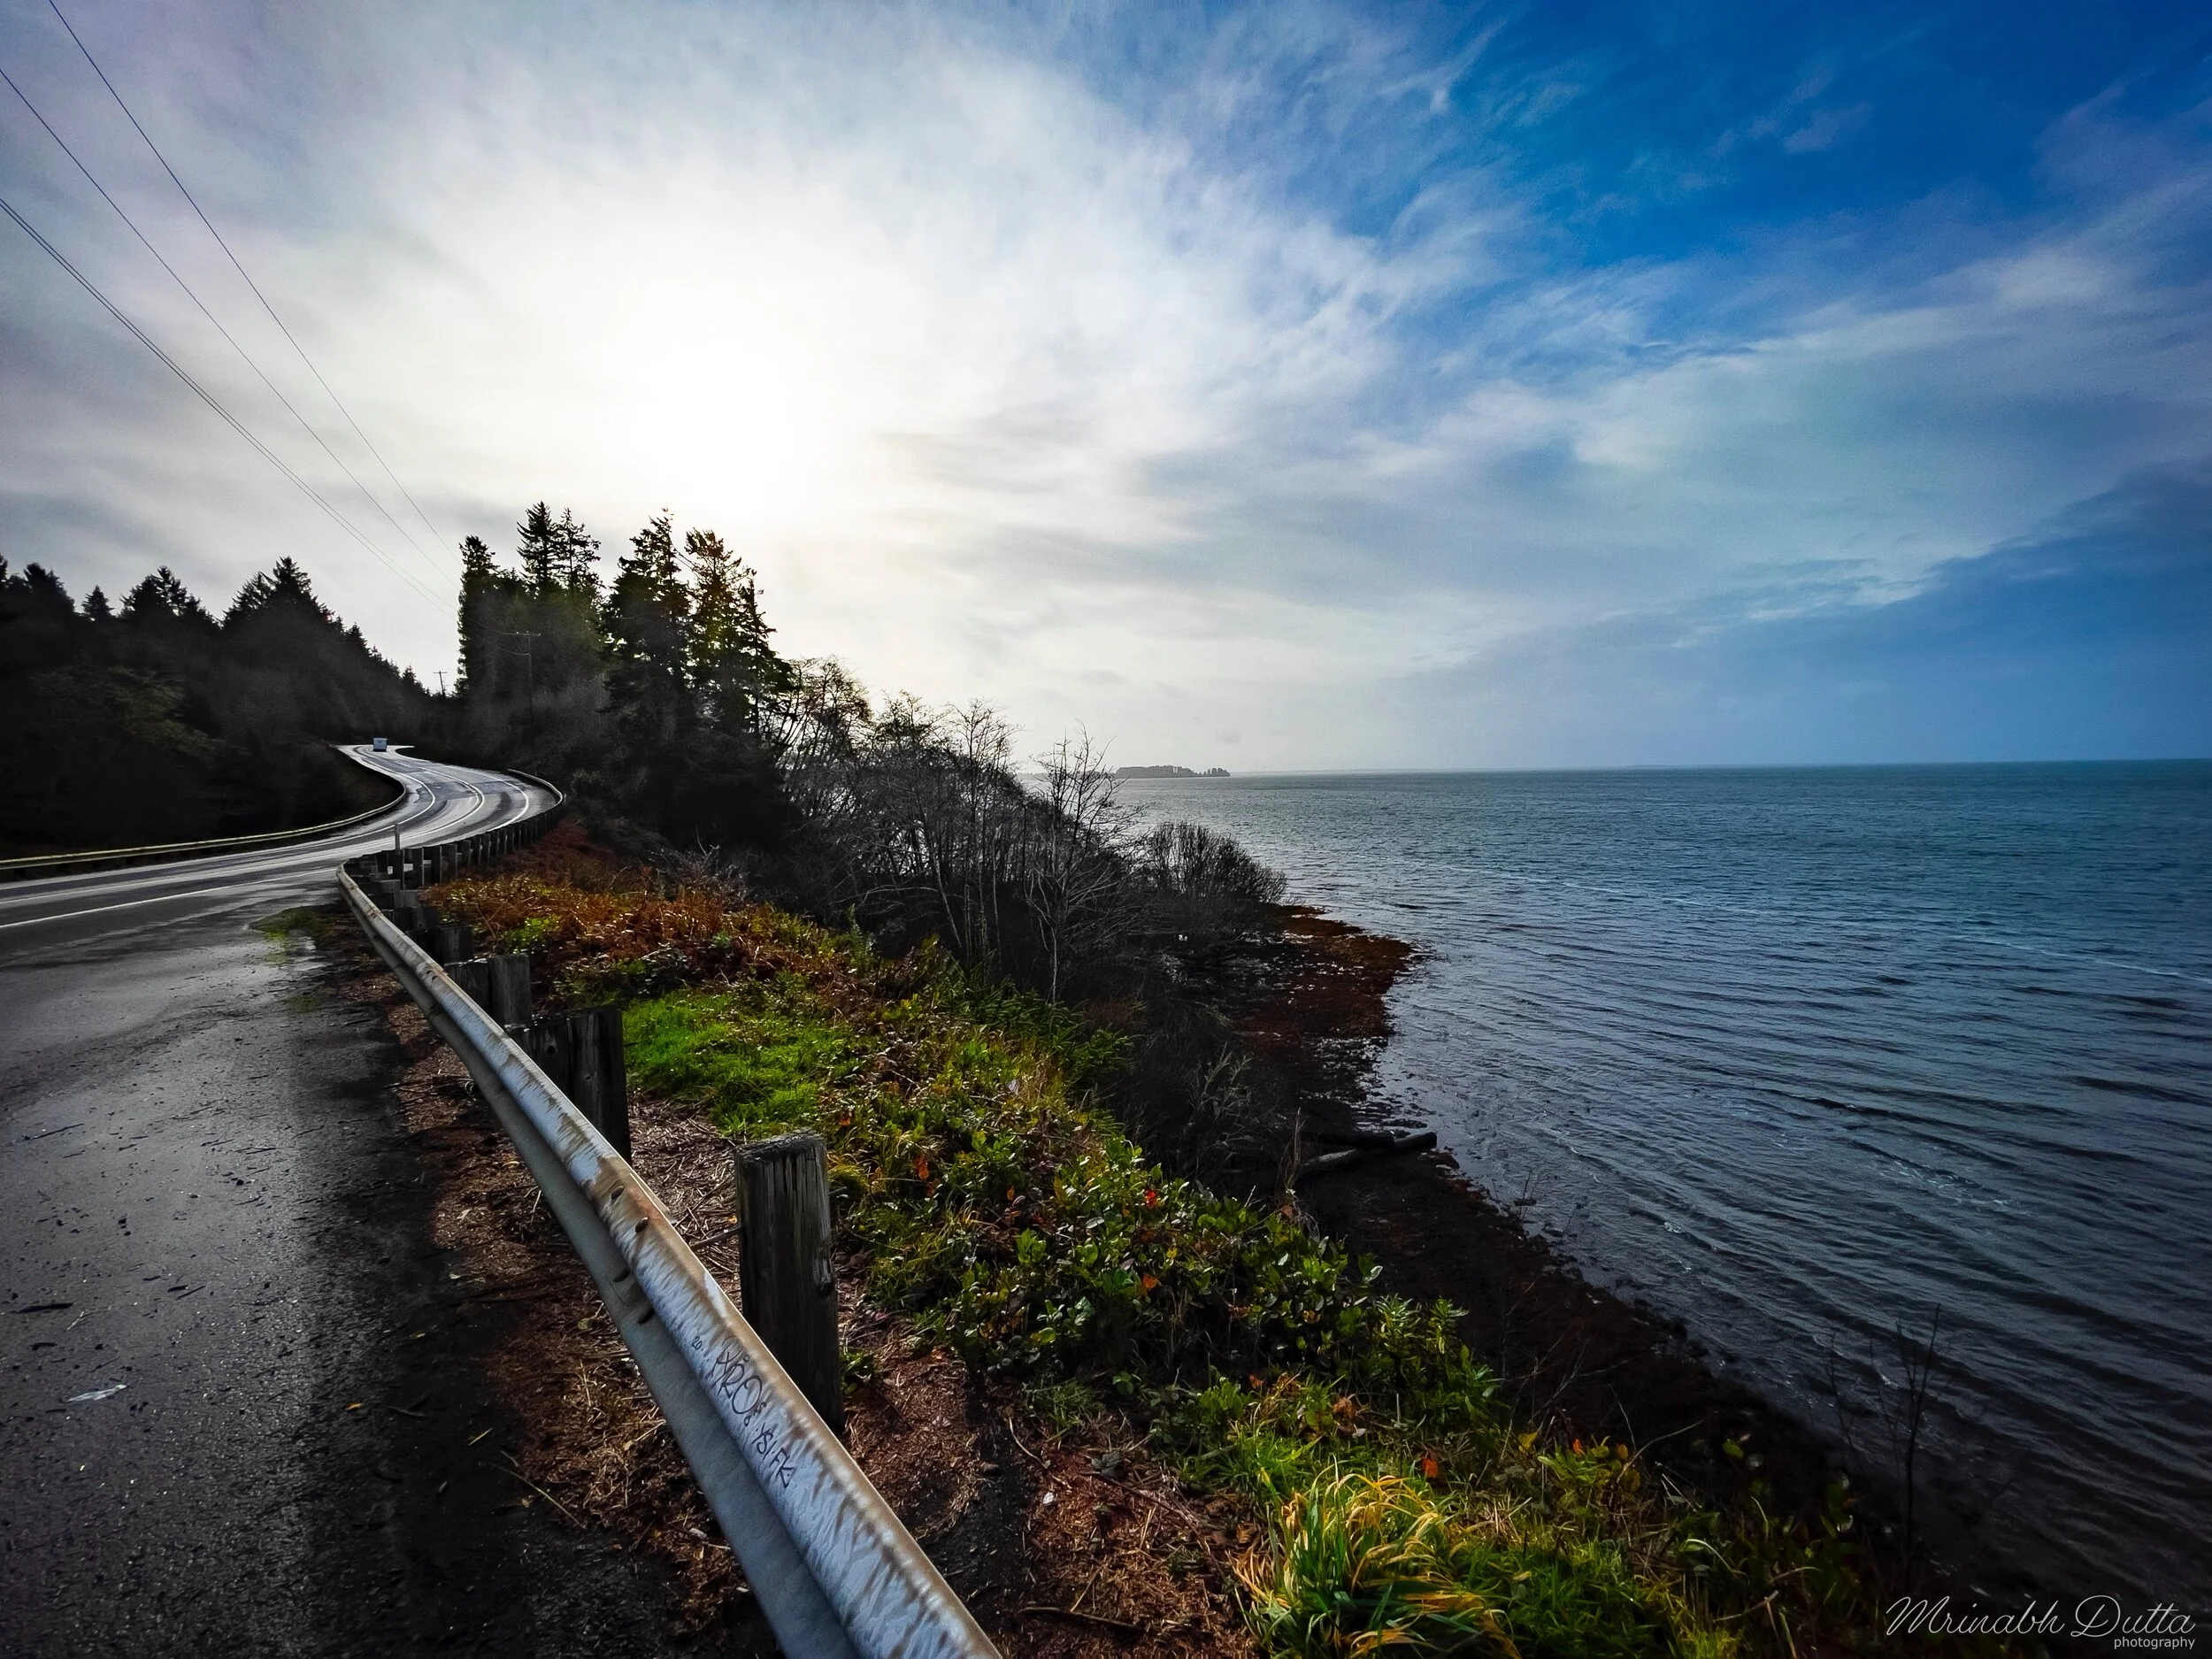
Stormy Sunday afternoon by the Pacific coast


Stable mobile workflow
Let’s be honest: We live in the age where mobile photography cannot be ignored. Smart and progressive professional photographers will acknowledge anyone can take great photographs using easily accessible cameras and softwares including the ones that are found and available in a cell phone today. So what is left for professionals and artists to create, inspire and make a living out of photography today? I’ll save that debate for another day. This post is all about my basic stable and sustainable workflow for semi-serious work when using the phone cameras. Like my previous posts about workflows and peek into behind the scenes, I will use an example.

Until a few weeks ago, my primary post processing app was Snapseed. I love it’s simplicity although I used only about 5% of all its features. The new iPhone 12 Pro Max with native RAW capabilities made me quickly switch (back) to Lightroom mobile. I am going to explain in a bit why.
Snapseed worked great for quick edits especially on jpeg files (or HEIC if you’re into it) however I found RAW editing somewhat cumbersome and not as user-friendly as Lightroom, and this was even before Apple introduced native RAW formats. Selective editing to my knowledge is possible only after initial adjustments done to the RAW image, and exported into a compressed format therefore, you loose all the benefits of shooting in RAW if you are editing portions of the image. Finally, all edits in Snapseed are destructive, i.e. you cannot go back and re-adjust an edit (although you have the option to undo actions). Lightroom mobile wins in all these limitations.

Most (if not all) photographers are familiar with Adobe softwares, more specifically Lightroom. The UX is quite different from Snapseed however, it didn’t take time to get used to it, the learning curve wasn’t very high.

In addition to exiting, Lightroom brings auxiliary functions such as viewing EXIF data, watermarking and bulk export - features that aren’t available in Snapseed.

Snapseed worked great for exporting into Instagram or Facebook but would I print any of the images? I’d probably not. I have not printed many from the LR pipeline but I’ll post here once I have something shareable.
Here is the final export of the example image (exported from the LR workflow):

Timelapse motion controllers: A five year journey
Prior to 2015, most of my timelapse videos lacked lateral and panning motion in them - i.e. I shot them with the camera on a single tripod. It was only around five years ago when I seriously considered bringing in the element of motion into my video production hobby that was growing fast, gaining ground over a dying commercial photography business. Back then I anticipated some day will launch a full fledged production company but it never took off past creating portfolio content. Nevertheless I used several motion rigs from various manufacturers over time, formed strong opinions on what works and what does not, and I’d like to share my experience in this blog post.
Disclaimer: I neither represent nor sponsored by any of the manufacturers mentioned in this blog. Everything I have written in this post represents my and only my opinion.
Homebrew motion rig using Arduino and CNC parts
The first rig I ever owned was built my me. While I wouldn’t claim the design was created by me, I worked on extending a few ideas from the internet into a hybrid and potentially very different rig from what I could find others were building at that time.

I started off simple: An Arduino based microcontroller programmed to move a single stepper motor and fire the camera with a basic shoot-move-wait-shoot subroutine. A motor belt ran across a simple aluminum rail with a pulley at the other end from the motor, with the carriage tethered to it. Mark One had no display, no buttons/input at runtime, the rig started when powered on and runs until powered off.
During field test, I found belt pulley system unreliable. The steps between carriage movement were not precise nor accurate. After filming a handful of timelapse sequences, spending much more time in post processing (stabilizing) the video, I was more than convinced to modify Mark I.

Mark II consisted of an aluminum C-rail with a screw head attached directly to the motor shaft, a system one would typically find in 3D printers. I bought the motor and rail setup kit from OpenBuilds, and re-programmed my Arduino for it. Also, added a TFT touchscreen to solve once and for all the problem of input/output for the setup. The new slide system lacking a belt made it the most reliable and precise slide I have ever owned. The system could carry a DSLR with a heavy lens in a vertical slide effortlessly.
PROS
The most accurate and sturdy slider
Programmable and extensible
CONS
Not weatherproof
No controller app on phone
Bulky, not travel-friendly
Requires lot of time to set up and teardown
Dynamic Perception Stage Zero and Stage One

The next ones up were two rigs from Dynamic Perception. These sliders were well-built, the controller being inside portable casing allowed me to carry the rigs in my travel outside driving distance (i.e. in air and sea travel) and since they are controlled via mobile app connected over bluetooth added convenience to operation.

The slide however, was still bulky although there were shorter rails available and they made them modular. Bright LEDs on the motion controller made it difficult to shoot after dark without putting tape on them. The motion control phone app was primitive but connects and works like a charm.
PROS
Simple design
Strong, reliable motors
Wirelessly tethered control via phone or computer
CONS
LED lights on the controller rendering the system useless for shooting at night
Requires lot of time to set up and teardown
Edelkrone Slide and Tilt Modules (First generation)
Edelkrone first generation motion control rig was by far the best and the worst system I have owned. The rig looked elegant, built in black painted aluminum, with no LEDs on any of the controllers (just audio cues indicating successful connection and other alerts). The slide could move twice it’s length when set up on tripod, and yes it needed only one tripod.
Where it gained in build quality and compactness, the system was severely crippled by weak motors and overall weight, especially the pan-tilt head. The slide controller has gear system that presses on to the belt instead of the belt going around it rendering slide motion unreliable especially with the heavy pan-tilt head. 100% of the timelapse sequences I produced using this slide needed stabilization/smoothin in post.

PROS
Sleek design, looks great
Slide travel distance twice the physical length
Improved (over Dynamic Perception) controller app
CONS
Unreliable slider, especially with heavy payload
Weak motors
Super heavy pan-tilt head
Conclusion
After going through all these sliders, I found myself going back to the Dynamic Perception Stage One system for its reliability. I have learned stepper motor is a must on slider system for timelapse shooting although, I can imagine videographers prefer noiseless or low-noise brushless motors. Looks don’t matter really, there is no one to brag about your cool motion rig when you are shooting in the middle of a desert or top of a mountain.
2020 AD: A year in photographs
2020 will go down in history as the most interesting (for lack of better word) year, at least for my generation who didn’t fight any major global conflict. Here’s a montage of this year in twelve photographs off my cellphone backup.
January
The year started off very dry (uncommon in the Pacific Northwest) and pleasant, I recall spending time watching and photographing beautiful sunsets over the Puget Sound. Then came the biggest snow storm of that winter around mid-January.
But the most significant memory of this January was the day I was hoping to show the future father-in-law (Dave) the ring I bought for my future wife - Emily. The plan however fell through when Emily decided to join us for the happy hour. Nevertheless we had a great evening in Stack 571 burger & whiskey bar.
No masks and no lockdown, COVID was just another old world disease we thought would not cross the Atlantic and the Pacific.

February
Emily and I got engaged, while traveling through Europe. The winter felt unnaturally pleasant even on the other side of the Atlantic.
Still no masks on the faces although overall tourists’ presence seemed to have started to diminish. I recall reading about the new flu mutation on my phone while sitting in the hotel lounge in Copenhagen, getting ready to fly to our next destination within Europe.

March
Last day in 2020 I was physically at work. Work from home was initiated ahead of the mask up directives. In fact, I recall CDC telling us masks were not effective in arresting the spread of the virus. Toilet paper and hand sanitizer were available at least through the first half of March.
In amidst the start of panic of lockdown, I found Animal Crossing New Horizon. Social gathering became a thing on rehabilitated remote islands run by Mr. Tom Nook and his minions. I did not know back then how many hours I’d put into this game but I will tell you now - it was worth it, every fucking hour of it.

April
The spring after a very mild winter felt like a premature summer. But instead of going for camping we were grilling meats and BBQ in the patio. It was the beginning of a long nice warm weather streak that would spread over months.

May
We began making long road trips looking for opportunities in photography. For a moment, I felt the global COVID crisis was a bad dream. It felt real only when you read the news, no one in my acquaintance had died of COVID yet.

June
Back to Utah after many years, shooting time-lapse and chasing storms. Restaurants were open for dine-in while most of the west coast had already shut down under new laws. The hotel we stayed in probably had less than ten other parties staying overnight, breakfast was served in to-go boxes and only alternate rooms in any given floor were open/available. The National Parks however were packed with people although they disappeared after dark.
Later on after the trip, I accidentally deleted all RAW files from the memory cards, thereby loosing all the photographs from the trip.

July
Topical temperature checker helped certain business gain confidence in allowing customers come in. In other news, NEOWISE comment appeared over the northern horizon, I was thrilled to have an excuse to drive into the mountains and distant places to photograph (my favorite) night sky.

August
More nights in the mountains, away from people.

September
Besides being my birthday month, we got married in September, we had a very intimate wedding with a few other guests. Immediately after the wedding, we drove up to Glacier National Park, spent a few days in a small town outside the park.

October
Not the best Fall I have seen in the Northwest but was nice to see foliage amidst everything else that was happening. I feel lucky to live in a small city in the evergreen state where maple trees are in abundance.

November
The weather continued to be nice (dry) at least through the first half of the month, enabling us travel far and wide within the state for sunsets and night sky. Unlike summer, fall weather feels a lot nicer for hikes and outdoor activities and the sunsets have more colors.

December
Few sunny days in the second winter gave us the opportunity to hike, discover new trails.

The really simple post-processing workflow
I have two main workflows when it comes to editing photographs - desktop and mobile. Until this year, the mobile workflow was very primitive targeted for social media posts however, I have modified it recently by bringing in advanced tools to align with the desktop workflow. This is a quick blog post describing the core elements in my desktop workflow.
The desktop workflow is primarily for editing photographs I take with the Sony system (and previously a Nikon system, both with hybrid lenses). 99% of the time I shoot with airplane mode enabled to preserve battery, especially since I mostly shoot still images as well as time-lapse sequences in the same trips or sessions. The post shooting journey begins with transferring the images (RAW files) to a staging folder in my laptop. The culled RAW files will almost always end up in a backup - local and/or cloud depending on the assignment or intent for future use.
Before we dive into the workflow I want to set the context to the example image file I will be using.
This image was taken during our trip to Glacier National Park in late-September, 2020. This was my first trip ever to the park and the primary intent of visit was not photography (Emily and I wanted to get away for a few days after we hitched). While I was hoping to see early signs of fall, it was not quite the scenery but these storms bringing in rain and snow moved through the area every day and combined with occasional sun creating amazing display of light and shadows throughout the visit. I was shooting mostly handheld, with ISO set to AUTO, adjusting only shutter speed and aperture. I thought evenly exposing bright background and dark, narrow silhouetted foreground under stormy weather would be a challenge however, keeping ISO at AUTO allowed me to worry about it later.
I knew right there while taking this shot what I want the final export to look like: Dark clouds moving across a bright blue sky, the falling rain columns across the valley contrasting to the dark shadows in the foreground.


When not stitching time-lapse video or panoramic composite, I go straight to Photoshop. I’d spend some time in adjusting highlights, shadows, temperature (white balance) and tint until I have the the image appear as close as possible to the desired final state. I know a lot of photographers emphasize on getting the “details” in the image by adjusting to the histogram but, this is not always the case with me. I’ll admit most of the time I’d want most (if not all) of the pixels in the image to have adequate data (i.e. not over or under exposed) however, this is not the ground rule in all instances. It really depends on what you want and aiming for in the end result.

Once I have applied the initial adjustments to the RAW file and opened the image in a Photoshop document (PSD), we are now in an open playground. Editing in Photoshop could take anything between a few minutes to hours depending on what I am trying to achieve. Very specific to the example, I applied the following (in order of applying/working on) adjustments:
Saturation boost to the bright background (sky and clouds) while masking the darker foreground (mountains)
Vignette using curves mask
Exposure boost to the foreground, then mask the bright/otherwise overexposed portion of the sky (likely where the Sun was behind thin clouds)
Warming filter to foreground
As I had mentioned before there is no one-recipe for all images in my workflow. Keeping a mental (or written) note of the post processing goal at the time of shooting the photo helps.

I’d almost always discard the PSD file in favor of storing the RAW files unless there is a need to perform multiple exports - e.g. if I want to print or distribute in more than one format. I think Photoshop does a very decent export job therefore, I will use it as often as I can although there are exceptions like when I need to de-noise an image prefer Lightroom. Typically, de-noise step happens prior to editing, as an extra step before importing into Photoshop.
Squak mountain
For the past few days, I have a hurting shoulder and neck from sleeping odd hours and bad posture, stopping me from going out and do stuff. But today we had an amazing winter day in the sun, had to leave my habitat and go for a hike.


It isn’t quite winter-winter in the Pacific Northwest yet. Well, at least not by the definition of winter in this general area (this far north from the equator) in the northern hemisphere. PNW winters however, are subtle: occasional snow but mostly it rains. The forests are still green, not just the coniferous trees but undergrowth comprising mostly of ferns and rustic winterproof trees and shrubs such as holly. The forest floor was wet brimming with life - flora, mostly with frequent symptoms of the presence fauna in all forms, insects to mammals.
Three hours later, I had a handful of Apple ProRAW files from my phone exported into Lightroom Mobile for editing.


Leaving the camera at home
With native RAW support in the phone camera, I have been shooting a lot more with the phone than ever before. When I say “shooting with the phone” I do not mean shooting for social media posts but producing images that might make it to prints. Here’s an early peek into my captures from the limited time I’ve spent exporting/working on limited Apple ProRAW photographs taken around my hometown.
The future looks very promising.


All photographs in this set were captured using an iPhone 12 Pro Max in native RAW, exported (after minor edits) in LightRoom mobile.

Recursion
In approximately a year’s time we see the same season, over and over again through time.

An obsession with forgotten history
History has its appeal in different ways.

Reanimation
It has been years since I started capturing timelapse videos, learning along the way both techniques as well as creative composition. Reanimation is a montag...
Helsingør
Don’t recall how long it took us to get into Helsingør from Copenhagen via train but it was a very wet day and I wasn’t looking forward to get out of the train station. This wan’t the first time: We have been to this city over a hundred times in the past, in all seasons spread across a two years period of exile in South Sweden. But, considering this in many ways a nostalgic trip, had to stop by the cities and places we have roamed in the past.

In the breaks between downpour from moving clouds wind blew through the narrow streets of the city, sometimes gusts of wind from the sound strong enough to deter walking. If I recall it was early morning (courtesy: jet lag) on a weekday therefore, the city seemed desolate. A typical midday would look much crowded, especially with tourists and locals frequently from Sweden who buy tobacco and alcohol products in the city market.


About twenty minute ferry ride connects Helsingør with Helsingborg (Sweden) where I worked for two years. After walking around the city we sat in the ferry deck and sailed back and forth a few times across the waters to rest our feet, before returning to Copenhagen via train.

A day away from Copenhagen
Over the past several centuries we have built remarkable cities and have made every attempt to make each one look unique and reflect the culture of the people living in it. But more than the significance of these creations in human history, I admire and prefer what lies outside and often out of reach for most part, throughout our existence, the Earth in its nascent form.
Sixty minutes driving south of Copenhagen starts to look like sixty minutes driving outside of most of the cities in upper northern hemisphere: The farmlands, trees, wide open land, crops, windmills, barns. I would not call it as attractive as any national park or preserve but it was a relief to get out of the city for a change, after we rented a car for the final two days of the trip. While I have been in and around Copenhagen over the past, had never been to the island of Møn before. As any other adventure, this was not planned for months or weeks - it was a fifteen research on the internet the night before, in attempt to find something new and different to do in Denmark before flying back home, and also a destination the weather forecast approved my not weather-sealed Sony photography gear.
And so I picked Møns Klint - a six kilometer stretch of tall chalk cliffs over Baltic Sea.

We picked a short hike that takes one through a prairie to steep stairs winding to the seaside with the white cliff to the back. At the end of the hike, there were no trail markers in a foreign language, nor buildings or structures to indicate the location of the place on the planet. For a brief moment, I felt I was not too far from home.

Brugge
We missed the train out from Brussels Airport because we took the last flight from Copenhagen, arriving a few minutes after departure of the last train for the night. I could have planned it better, perhaps. Fast forward an hour and half checked in to the hotel, unpacked, and ready to start the next day explore the city of Bruges (or Brugge). The excitement could not keep me from falling asleep for we were dead tired from lack of sleep and jet lag since a few days before the short hour-something flight and another hour-something taxi ride.
I did not know about this city until we watched In Bruges ten years ago. Medieval canals and bridges, brick roads, horse carriages and ancient towers: things one would expect to see in the European south. But here is the catch: You are not in the south, you are close (or might as well call it inside) Scandinavia - clean, less chaotic, less crowded part of Europe in the west. It seemed to me as the perfect spot to get away and unwind especially in winter when nobody is around.
And, I wasn’t disappointed.


It never came across as a city I would want to photograph rather the appeal was purely in terms of getting out of town and relax. So naturally I did not pack an array of lenses and photography gear for this trip. It is possible I am slowly embracing mobile photography over using pro gear, for several reasons but the most important one being portability.
One evening however, we got into bed early so we can wake up before the morning hustle and take a few photographs of the city before sunrise.


The weather was perfect, sunny in the morning with occasional drizzle through the afternoon and then cold night time, often below zero and sometimes a little bit of snow. The city core is small enough to navigate on foot in an hour, or even less if you do not stop every corner to take photos like we do.

Would I travel again to Bruges? Perhaps I would but perhaps with a wide lens next time.